I would like to try blogging, but it seems too hard and I don't think I can do it.
I couldn't start a blog for about six months after I thought, "I want to blog! I couldn't start for about 6 months after I thought "I want to blog!
After all, it takes a lot of strength to start something new or to try something you are not good at.
At that time, I wasI had hardly ever even sent out a social networking message.Level.
Even for me,It has been surprisingly easy to set up a blog and keep it going until now.
In this issue, we discuss how to set up a blog,I will explain so that anyone can get started while also keeping in mind the points I actually struggled with!
Just like studying for a test,The hardest part is getting started.Sometimes (laughs).
In line with this article,Open a quick and easy account and start your blogger!
We'll get to that later.By utilizing "self-back" you can start a blog at zero cost while earning tens of thousands of dollars!
Flow of this article
First, understand the whole process of starting a blog
Check how much money and time it will take.
Explanation of specific steps to complete the opening!
TOC
The first step in setting up a blog is to understand the big picture!
Everyone gets anxious if they don't see the goal.
'Oh! That's how you set up a blog!"
about ... in level (e.g. "about 1,000 years old")It is perfectly OK to do this somewhat, so let's get the big picture first!
And before that...!
'What should I use to start a blog in the first place?'
This section is explained here!
Which blogging service to choose? In conclusion, "WordPress is the best choice".
This is a point that many people have trouble with at first,Conclusion.WordPress is the way to go."It is!
Broadly speaking, blogging services are divided into two categories.
[aside type="boader"].Rental blog (=rental)
∙ Build it yourself from scratch with WordPress (i.e., a new house)[/aside]
(i) Rental blog (=rental) 2) Build your own from scratch with WordPress (i.e., a new house)
What is a rental blog?
Hatena Blog Ameba Blog FC2 Blog Livedoor Blog
These are the most famous places around here that you have probably heard of.
The difference with WordPress is that it is oftenRental or new home?"It can be likened to a
This sounds like it would take a lot of time and money, but...
howeverPlease rest assured!
Specifically, even though we are building from scratch, we are basicallyThe mold is already made.Use the
There are a number of themes, but there are not many for beginners to choose from to avoid regrets later on, which will be explained in more detail in the latter part of this section.
If you started out with a rental blog and are gradually enjoying blogging,We will switch to WordPress pretty soon.
Actually, this is a hell of a lot of work.
I'm in the process of migrating my blog to WordPress, but it's mooooooooooooooooooooooooooooooooooooooooooooooooooooooooooooooo hard.
If you're going to do it anyway,Always, always, always set up your blog with WordPress!
Let me preface this by reviewing the entire process of setting up a blog from this point on!
Surprisingly Easy! 4 Steps to Becoming a Blogger
STEP
Sign up for a server
STEP
Obtain a domain name
STEP
Install WordPress
STEP
Initial setup of WordPress
There are only 4 steps to create your own blog with WordPress!
How did you get your blog up and running?It's like building a house with "new homes."It is!
Get land and address (server and domain), choose a mansion (theme), and furnish it to be at least livable (initial setup).
Thank you for your hard work so far!
Just keep these details somewhat in mind,You can smoothly launch your blog until the end of the process!
Things to consider before setting up a blog|How much money and time will it take?
I'm interested in blogging but worried about the time and money involved...
This is the only point I can't help but wonder about!
Let's look at them in order!
Opening cost: Initial and monthly fees, respectively
To set up a blog with WordPress, you will need to pay the following costs
Server (=land) contract: initial and monthly fees
Acquisition of domain (=address): approx. 1,000 yen
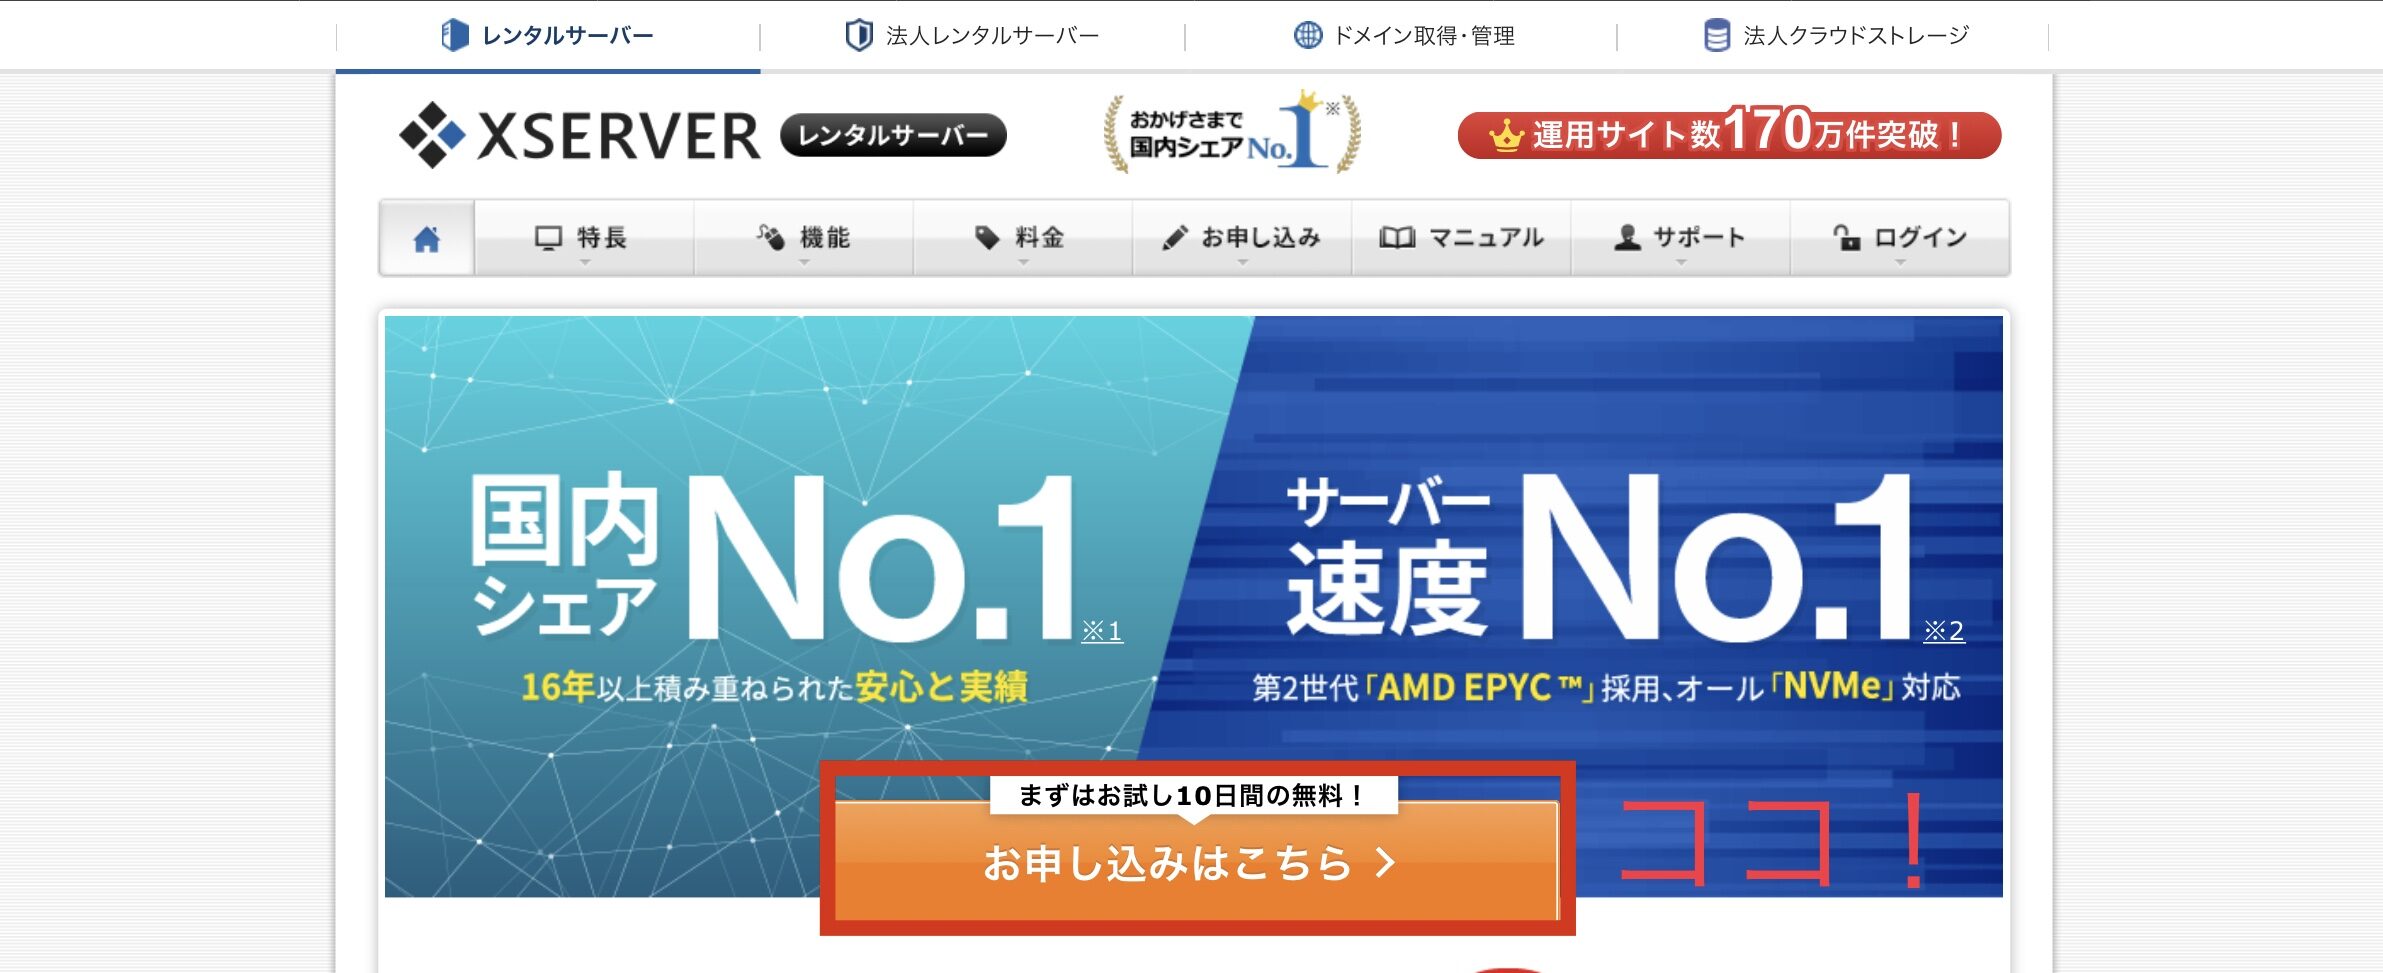
There are a number of server types, but as with WordPress."This is the one!"We will introduce you to one that is called
X server."andMost users,Trusted server used by most of the bloggers who are actually active in the field.It is.
The plan isx10"Select the
スクロールできます
contract period
Initial cost
Usage Fees
total amount
3 months
3,000 yen
1,200 yen x 3 months
6,600 yen (excluding tax)
6 months
3,000 yen
1,100 yen x 6 months
9,600 yen (excluding tax)
12 months
3,000 yen
1,000 yen x 12 months
15,000 yen (excluding tax)
24 months
3,000 yen
950 yen x 24 months
25,800 yen (excluding tax)
36 months
3,000 yen
900 yen x 36 months
35,400 yen (excluding tax)
Let's say you sign a contract for the shortest contract period of 3 months. Total 6,600 yen (excluding tax) for server fee 7,600 yen when combined with approx. 1,000 yen for the domain fee
The total initial cost, including tax, is calculated to be about 8,360 yen.
After the fourth month, the monthly equivalent server fee is only about 1,000 yen per month!
However, most people will be able to earn about $1,000 per month after about the fourth month to six months,It is as if there are virtually no fixed costs.
Further,Self-Back."By making good use of the mechanism ofThere is no cost at all, and you can start blogging while earning tens of thousands of dollars right from the start!
How long does it take to get a blog up and running?
The fastest one takes less than an hour.I spent a lot of time researching the process in various articles, so it took me a total of less than two hours.
If you can do it while watching this article,It would take less than 1 hour and 30 minutes~2 hours to complete.
Since it takes several hours for the server settings to take effect, the time required for the work alone is about the same as the time shown above.
I did a little bit of it for about 3 days, but if I interrupted it, it would only take me more time,It is recommended to do all the work up to startup at once!
Steps to set up a blog (1)|Contract a server
STEP
Sign up for a server
STEP
Obtain a domain name
STEP
Install WordPress
STEP
Initial setup of WordPress
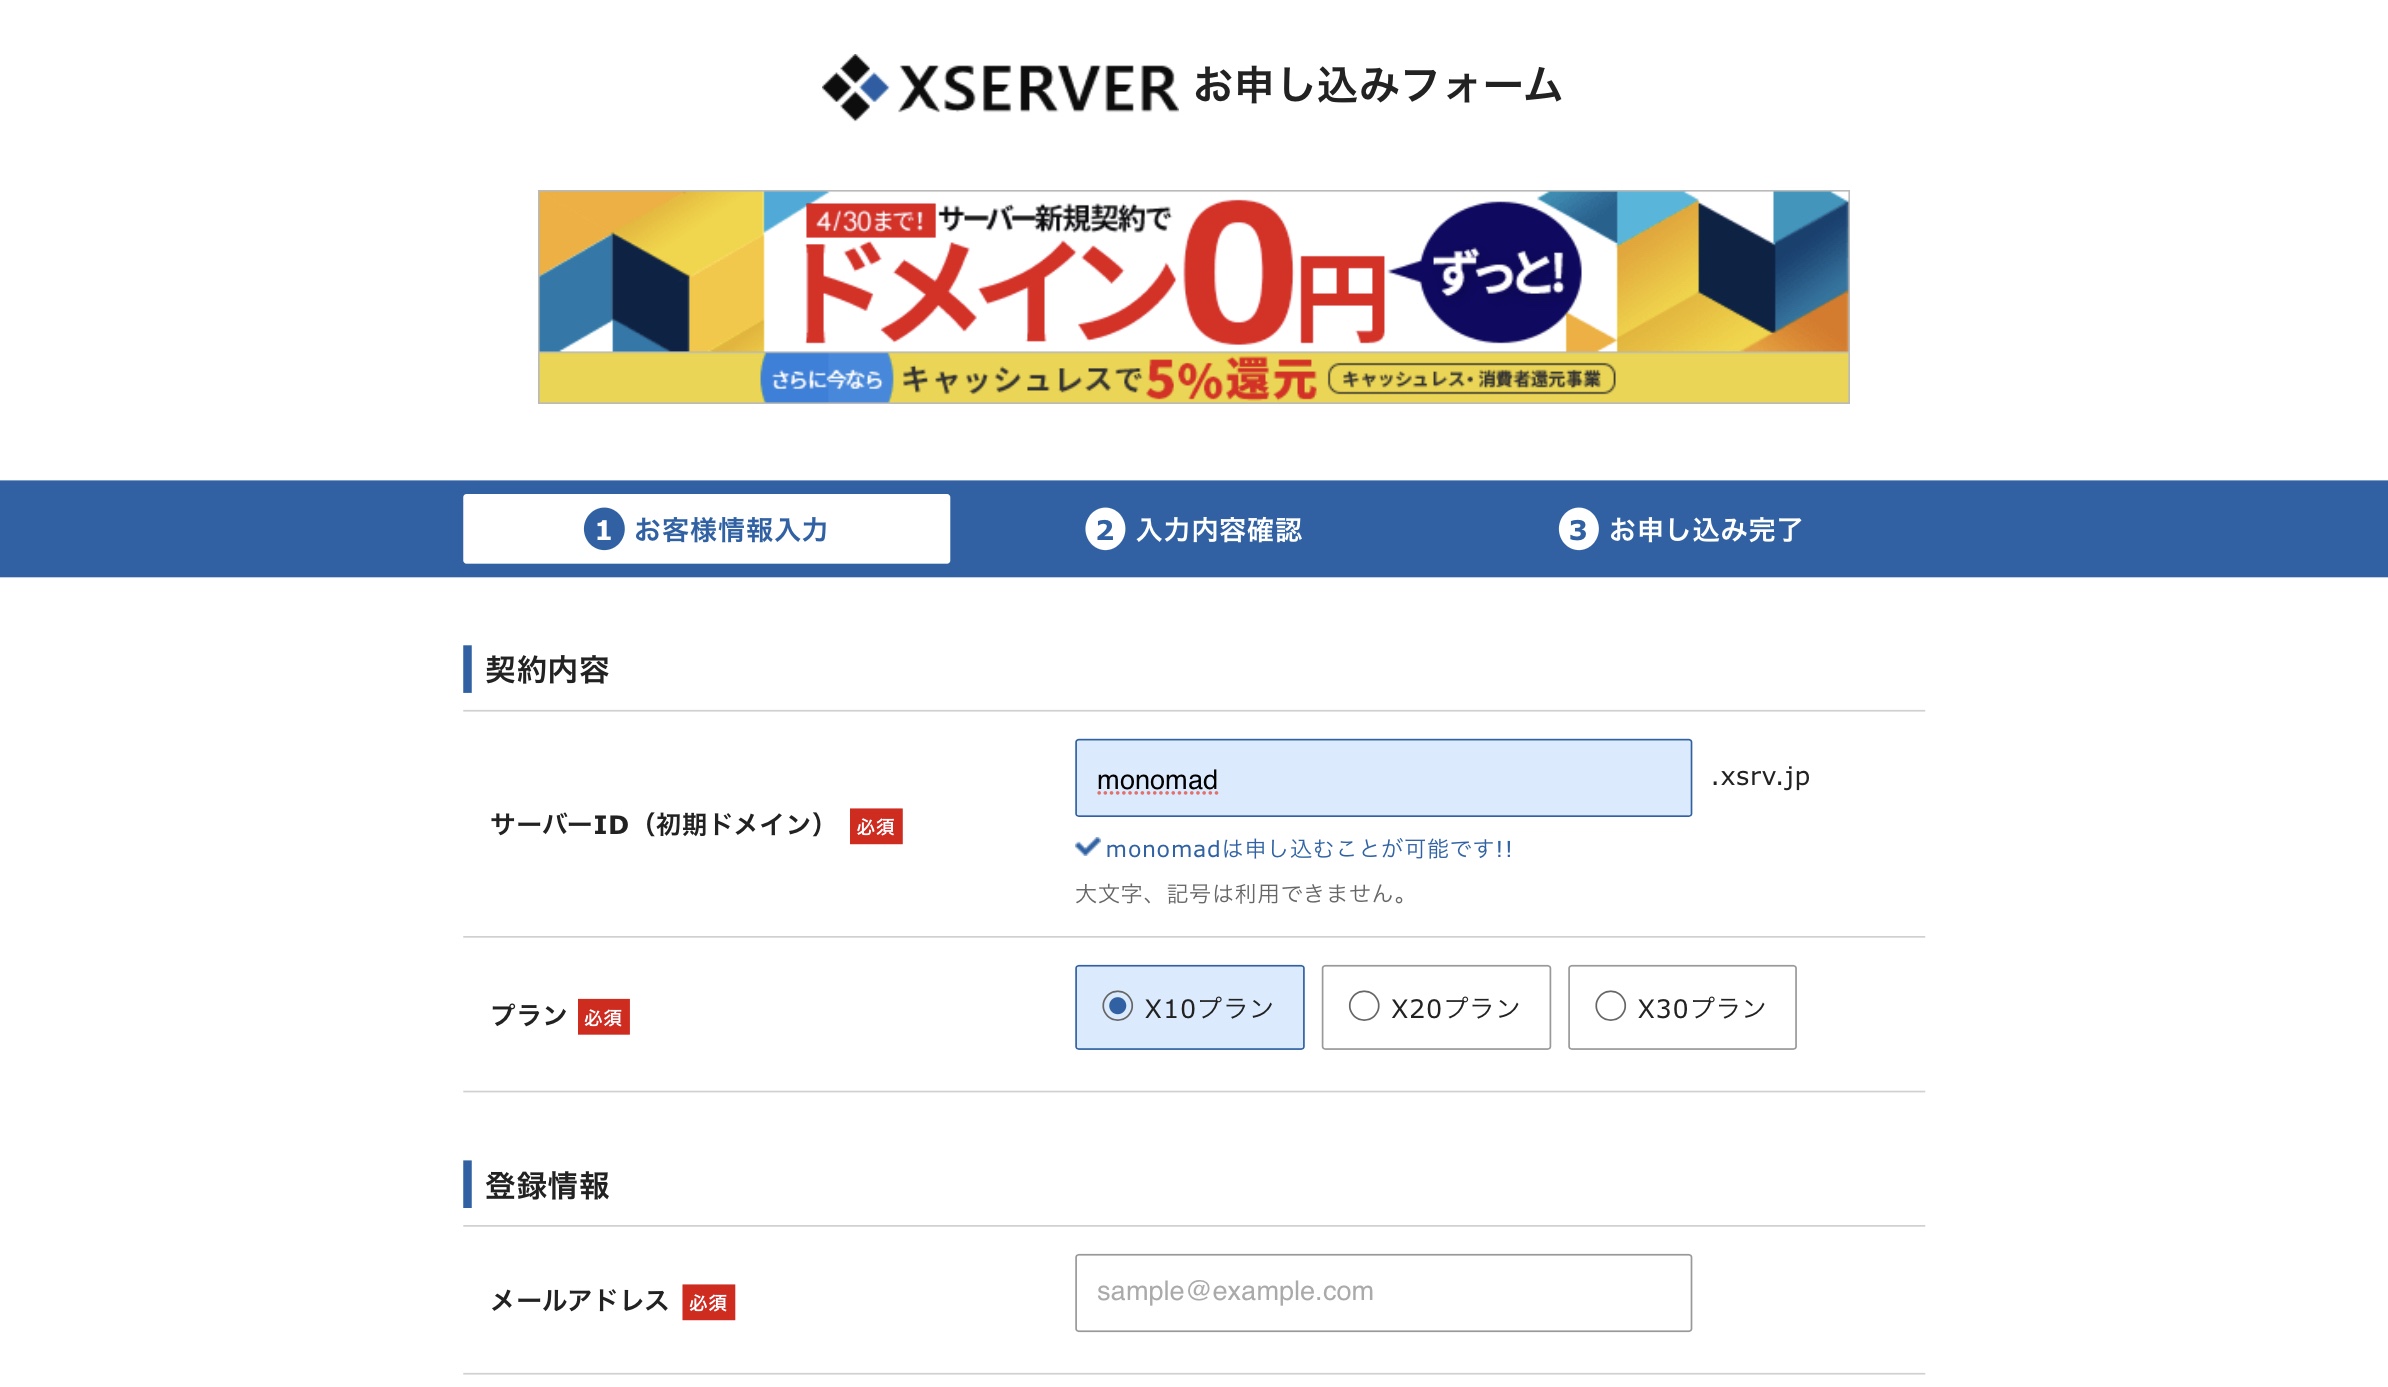
The first of the four steps to becoming a blogger isServer ContractsIt was.
The server was introduced earlier.."X server."x10 plan ofwill be introduced!
Why X SERVER is the best choice for a beginner blogger to start up a blog?
Among several other servers,Why unconditionally choose "X server"?
The reason is very simple.
Because there will be no regrets later.
This is very similar to the earlier discussion of renting a blog or WordPress.
I'm not going to say which server, but if you choose another company's server, you will eventuallyThe site is no longer comfortably viewable after the blog started to grow.This may be the case.
The rest.Ease of use of management screenand ... andGenerous support in case of any problems.
In the overall price and content of these services,Definitely the server to choose.It is.
Now, we are off in earnest!Let's go from here at once!
From this point forward, open the official website below and proceed steadily, one at a time!
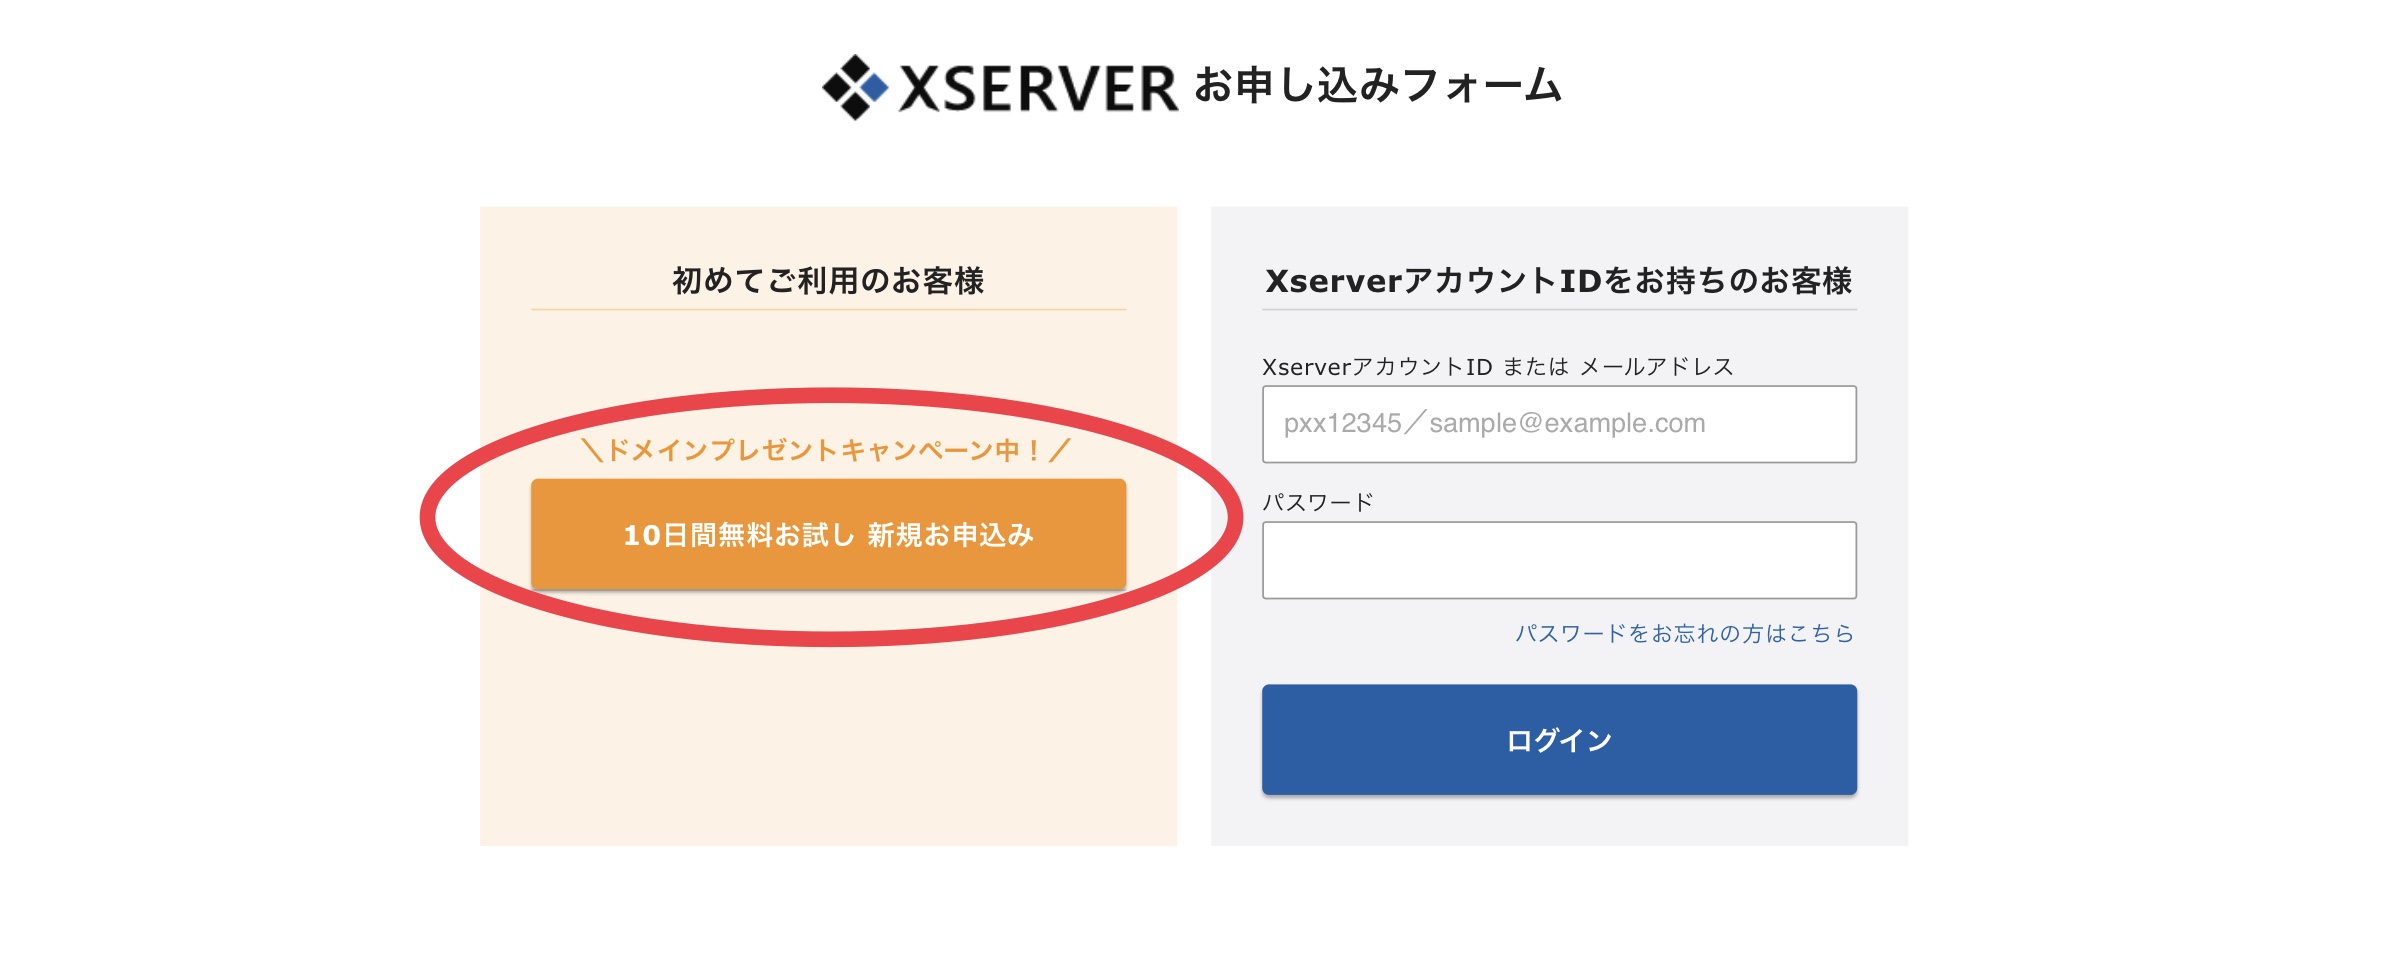
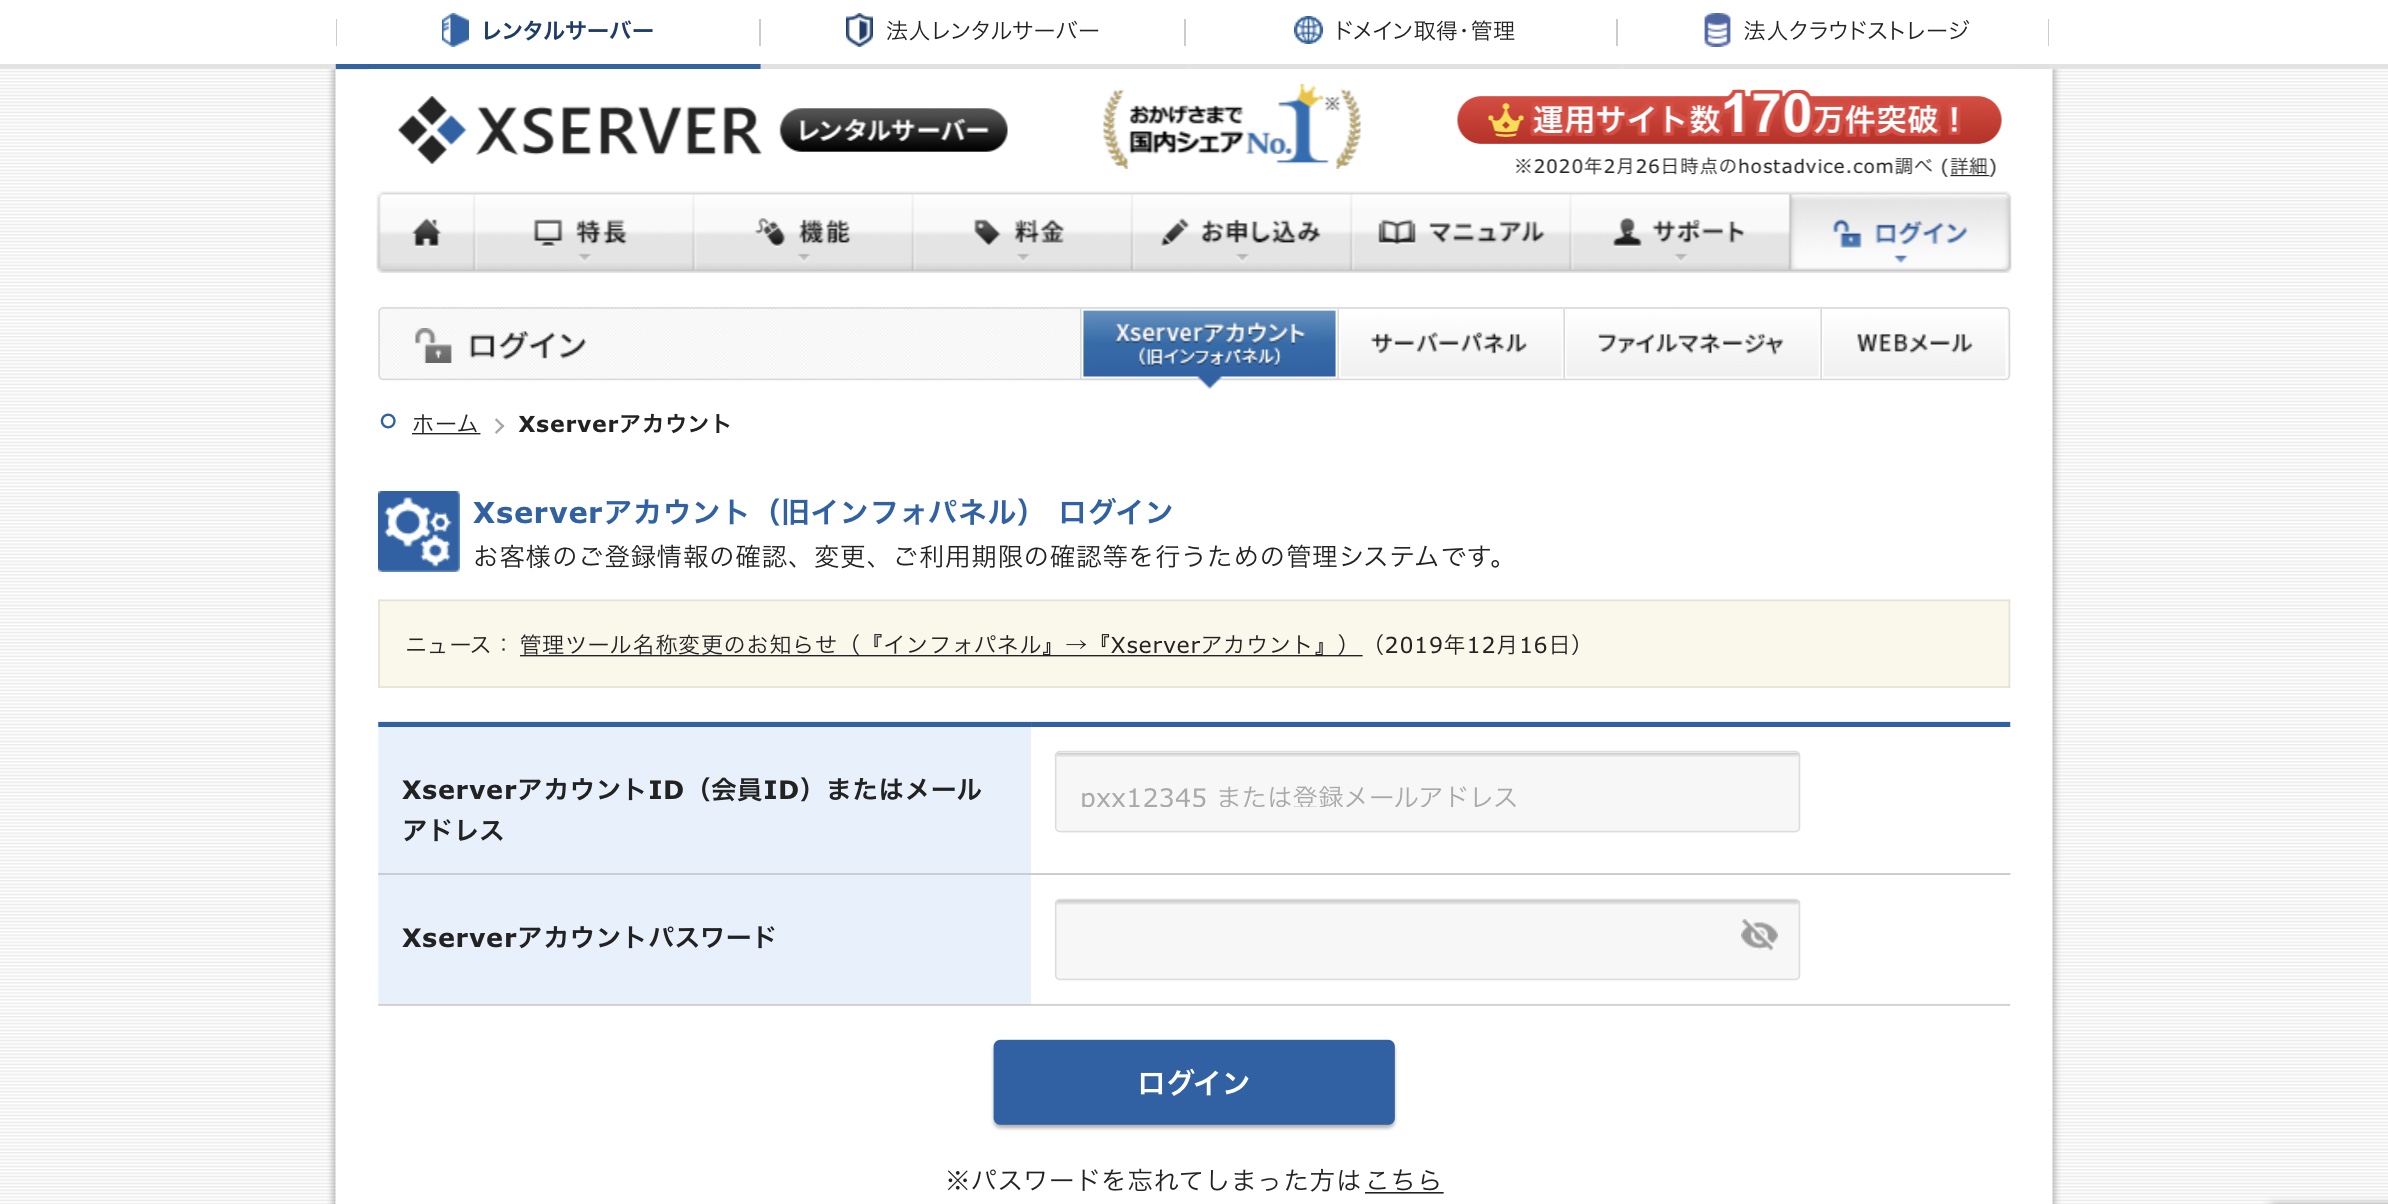
Xserver] [Important] Notice of Completion of Server Account Setup [Trial Period].
You may have received an email with the above subject line.
This way.
Xserver account ID Xserver account password
are listed, enter each of them.
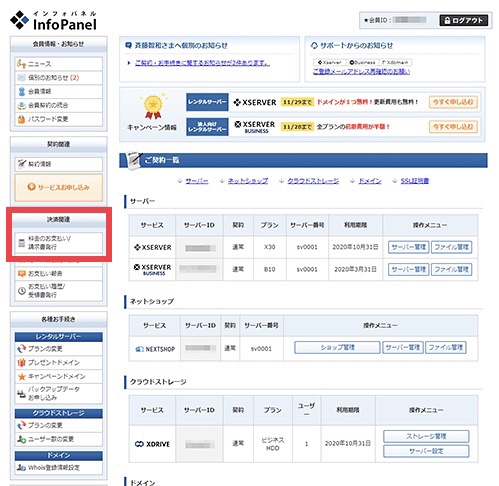
Go to "Payment Related" -> "Payment of Charges" in the red frame.
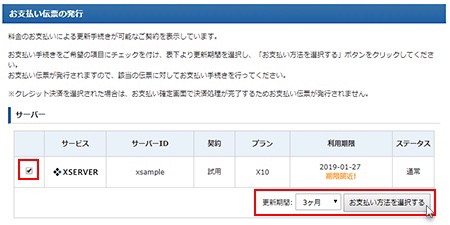
Check the box for the server you have a temporary contract with and select the renewal period.
The duration can be 3 months.
Complete the payment by credit card to complete the payment,contract (entered into on the basis of a promise or previous agreement)The first two are the following.
This completes the first of four steps!
Steps to set up a blog (2)|Get a domain name
STEP
Sign up for a server
STEP
Obtain a domain name
STEP
Install WordPress
STEP
Initial setup of WordPress
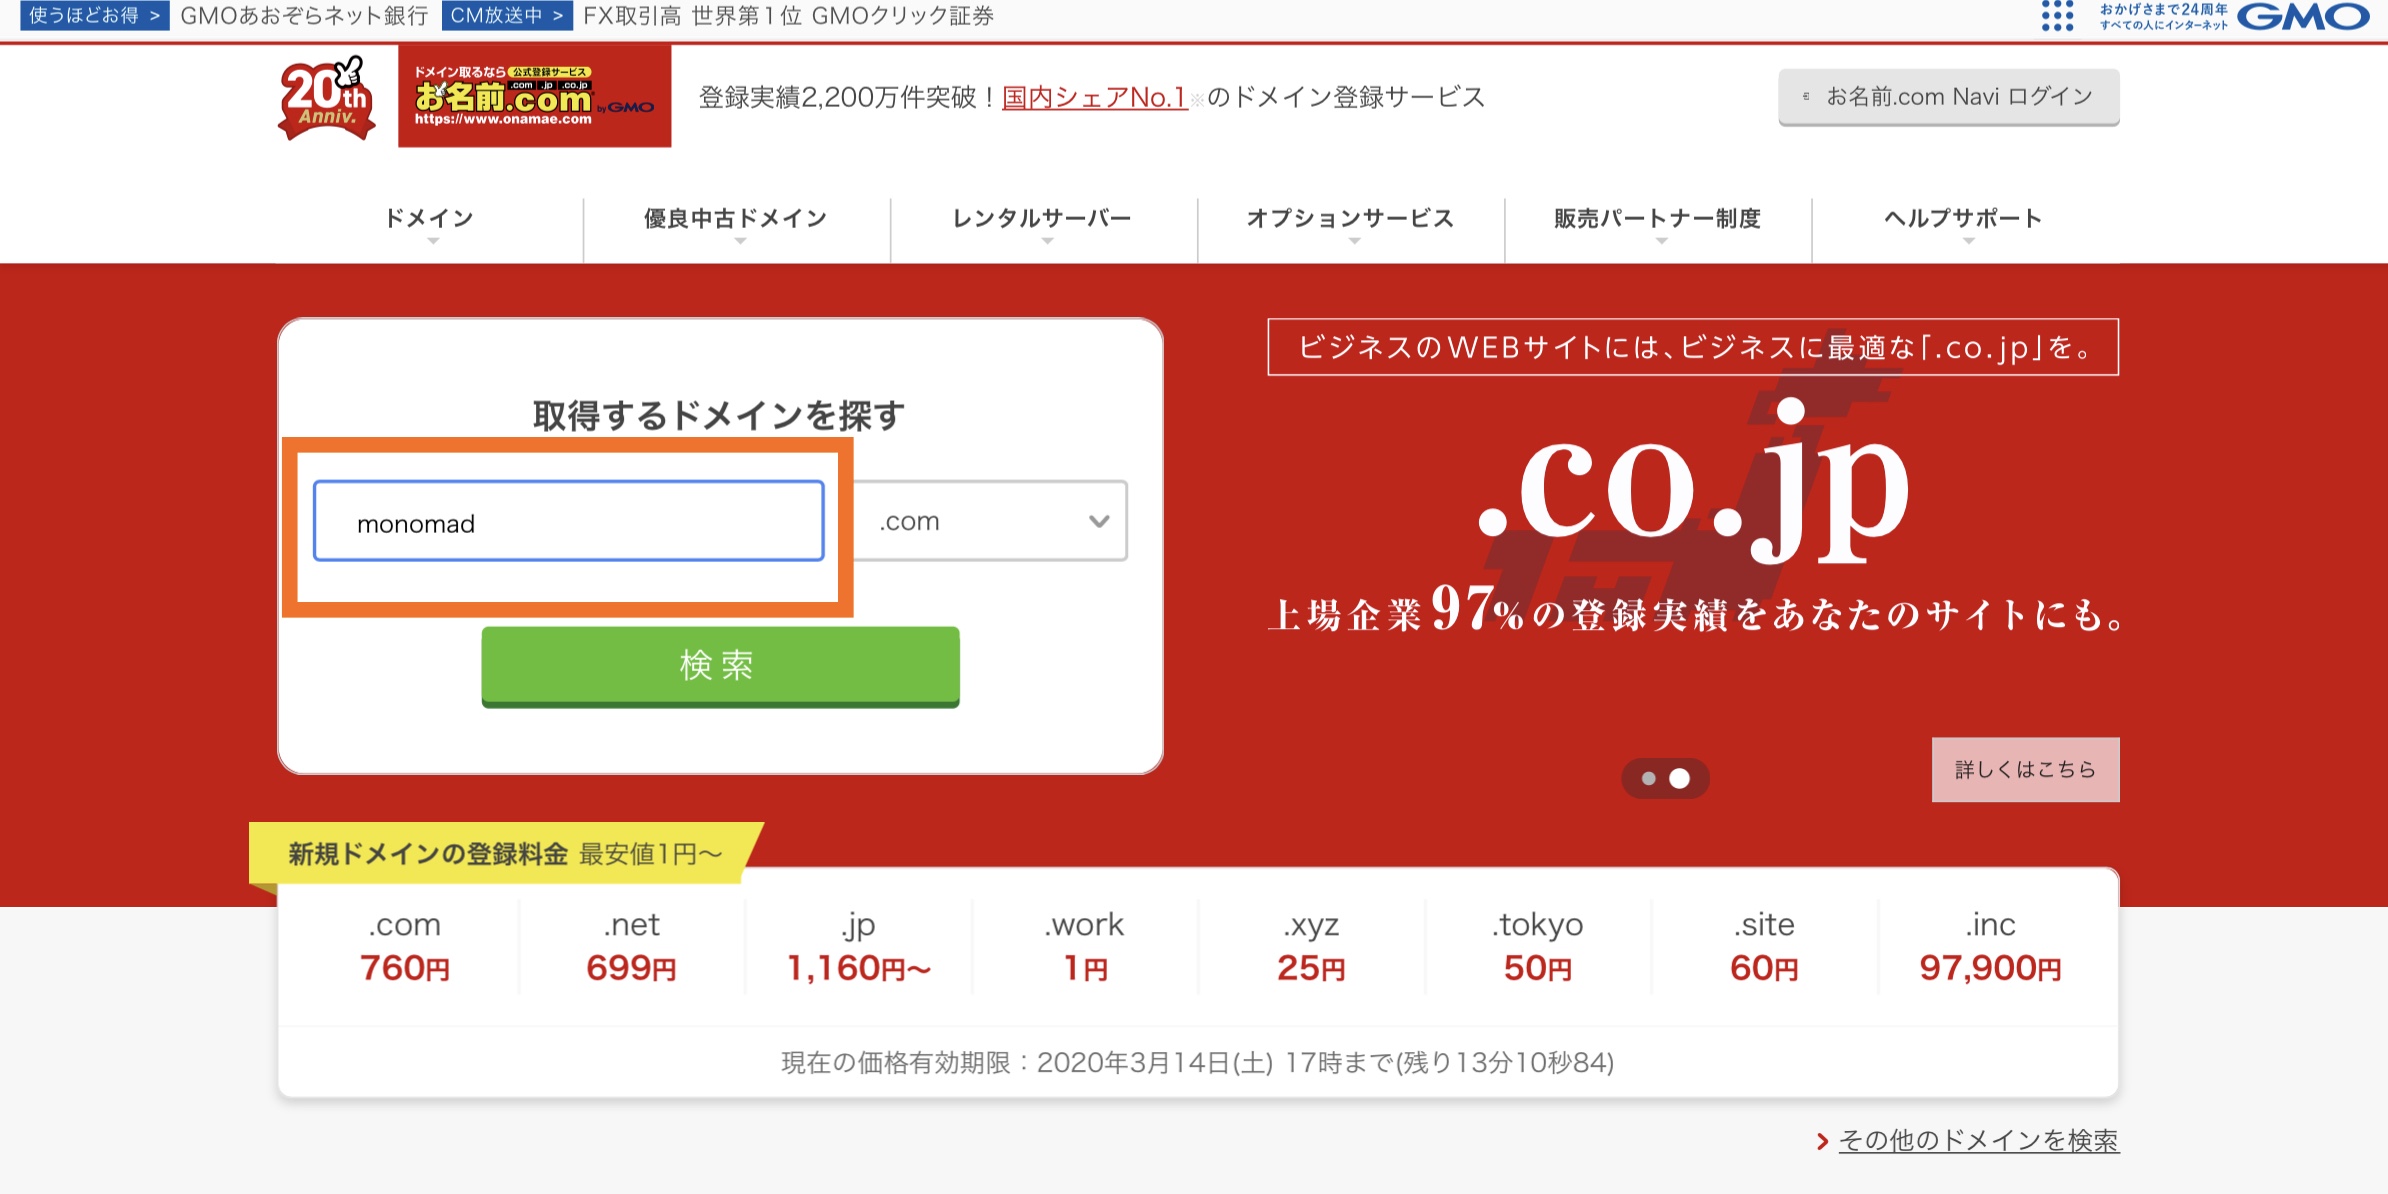
The second step is,Obtain a domain (=address)Things to do.
What is a domain?
00.com.URLs such as
The process is to change the 0000 part to a blog name or keyword of your choice!
Domain,Name.comThe information is obtained from a place called
This is not necessary if you acquired your domain through an X server campaign or other means!
Obtain a domain name at "Name.com".
Domain name acquisition is also not a lost cause.Here!"a company called "The Company".
There are promotions that offer savings if you sign up for a server as well as a domain at the same time, but only for the domain! The best server is the X server mentioned earlier!
Step 2)is a flow like this!
Decide on a domain name
Application and Payment
Domain name acquisition completed with email verification
Connecting Domains and Servers
We will quickly clear them one at a time!
1: Decide on your own personal domain!
First,Domain NameandTop Level Domain."(like the last ".com").
These two decisions will be made!
Domain Nameis the 00 part of "00.com"!
Enter the part that corresponds to 0000 in the orange frame.
This is,Included in the URL of the blog's home page and all postsThe first two are the following.
How to decide on a domain name
Basically, most people use the name of the blog. Any name will not affect the blog's rating, but it is recommended to keep it short, 10~15 alphabetical characters! Names already in use cannot be duplicated, so add a word or a number sign!
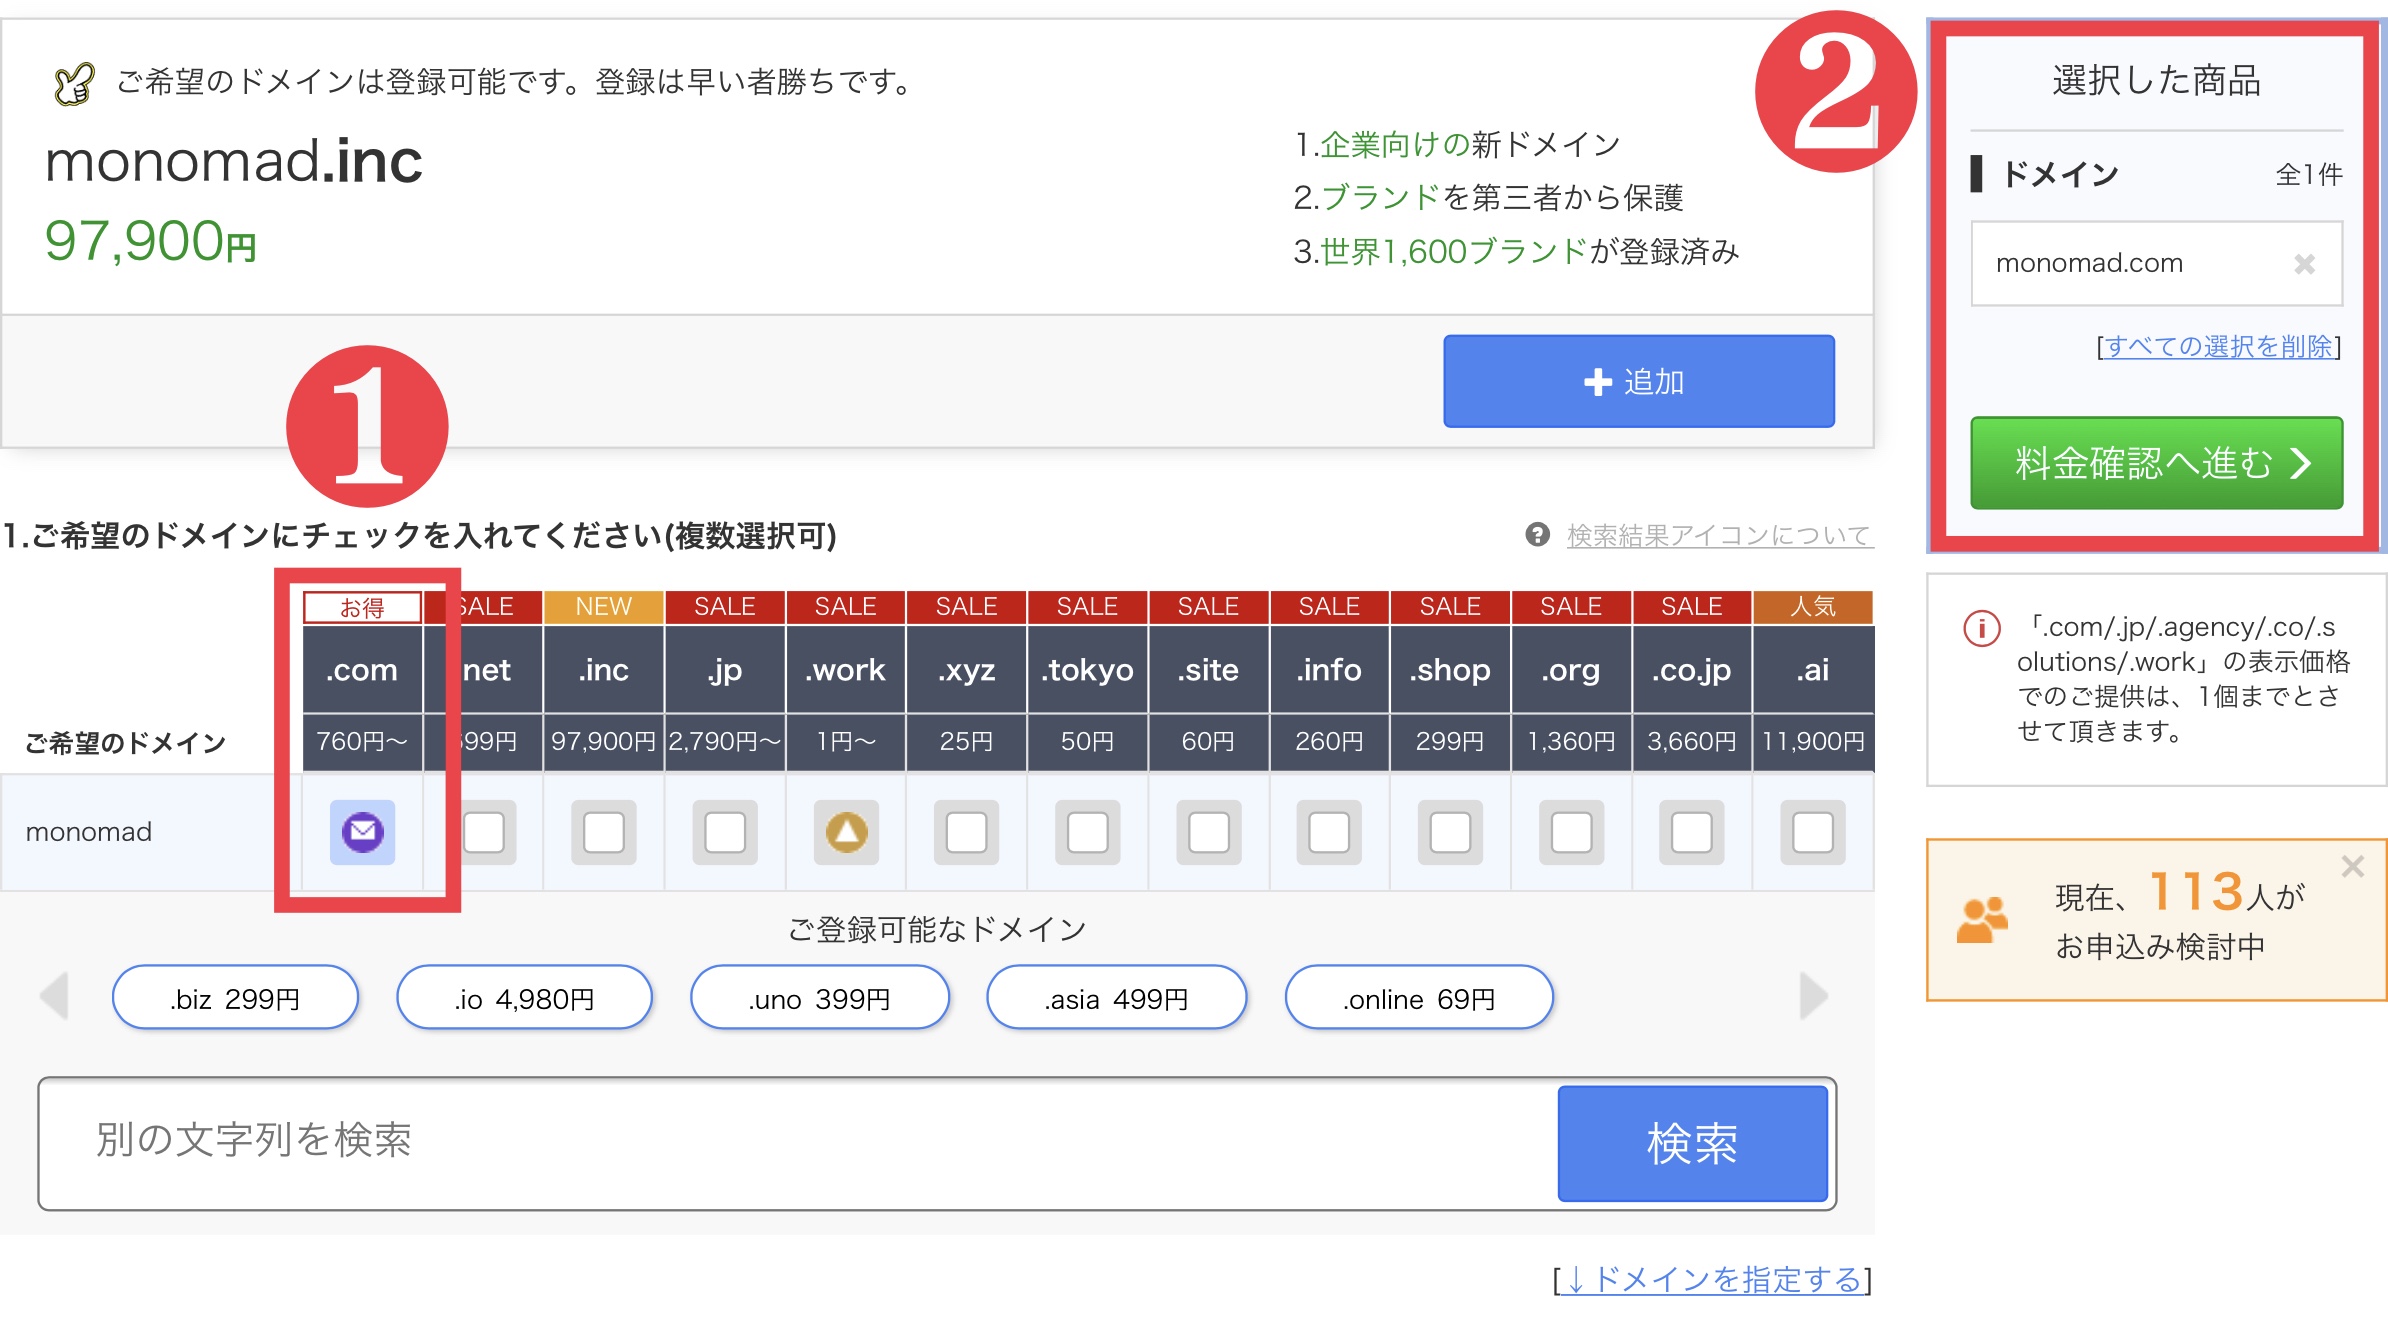
Next,Top Level Domain."You will be taken to a screen where you can select
There is a lot of different information on this screen,Only (1) and (2) in the image are touched!
There are a number of options, though,You can choose the most royal ".com"!
I also use ".com".
(2) TheSelected Productsfield in the "What is the name of theDomain Nameand choseTop Level Domain."and proceed to the next step!
2: Apply for a domain name and pay the fee
First time user?
Enter your email address and optional password here.
*At this time,Whois Information Release Agent Email OptionandDomain Protection."The items in theNo check requiredIt is!
The "product name" is.com 1-year registrationand that the label is displayed!
Enter each item of membership information and proceed to purchase!
3: Activate the domain by authenticating from your email.
Finally,Activate domain from emailThe following is a list of the most important factors that need to be taken into account when making a purchase.
I think you will get about 5 emails.
[Important] [Name.com] Request for Domain Name Authentication
Open the email with this subject line,Authentication link."Click on the "+" button!
Thank you for your hard work! Here you go.Domain name acquisition is complete.will be!
A little more work is needed to complete step 2).
4: Connect the domain to the server
You have completed the server (land) contract and domain (=address) acquisition in Step 1) and Step 2) up to this point!
The last thing to do in step 2) is,this (something or someone close to the speaker (including the speaker), or ideas expressed by the speaker)Work to connect the server to the domain
In other words,Image like tying land to an address.It is!
It sounds difficult all at once, but it is all right if you do it while watching!
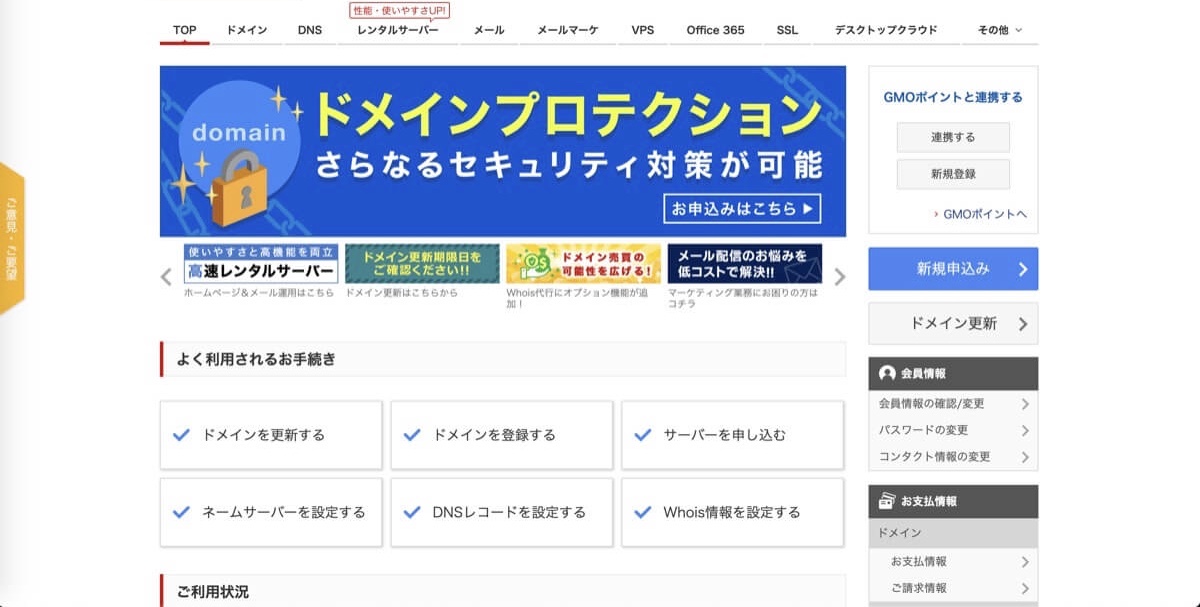
Server IDandServer panel password.is sent by the X server.
Email notifying you that your server account setup is complete."
It can be found here.
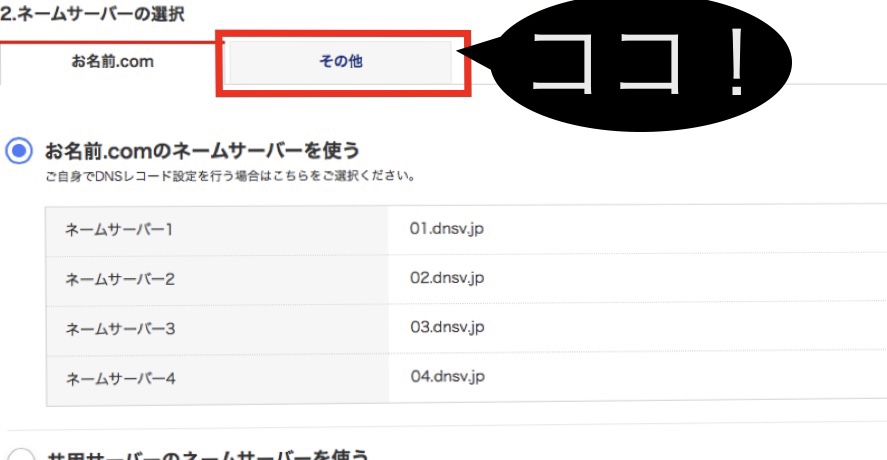
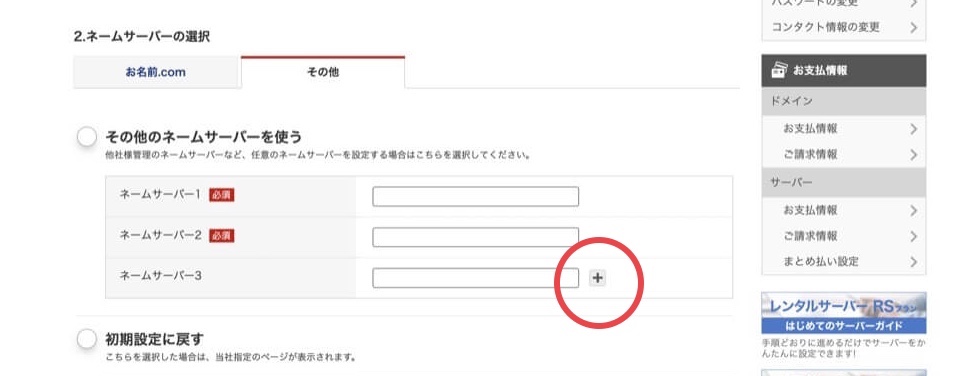
Image.Domain Settings."than
Add Domain Settings"Click on the "+" button.
There is a field to enter the domain name.Enter the one obtained from "Name.com" (00.com).
Use free proprietary SSL (recommended)
Enable "X Accelerator" for speed and accessibility enhancement (recommended)
Don't forget to check these two boxes!
last timeProceed to Confirmation Screen" → "Proceed to Confirmation Screen" → "Proceed to Confirmation Screen" → "Proceed to Confirmation ScreenAdd."Click on the "+" button.
I understand that domain setup may take up to 24 hours,Generally takes a few hours to set upI will do so.
Next,Setting up your own SSLThe following is a list of the most common types of products that can be used.
It is not at all necessary to understand the details.
What is Proprietary SSL (Secure Socket Layer)...?
Encrypting data exchanges improves the security of your own blog.
Many bloggers, though, overlook this surprisingly,Contents that should be set without omissionIt is!
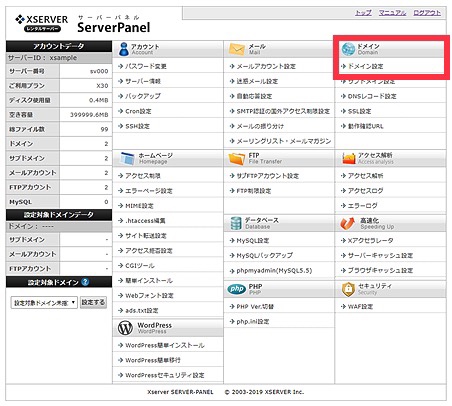
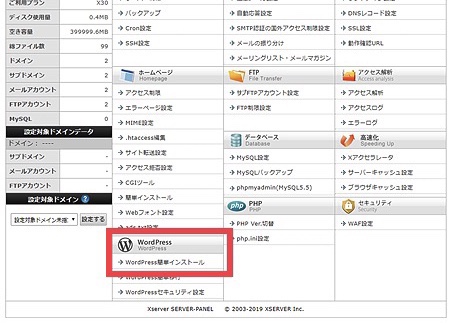
Below.WordPress" -> "WordPress Easy Install"Click on the "+" button.
Red frame,WordPress Installation."Select the tab for
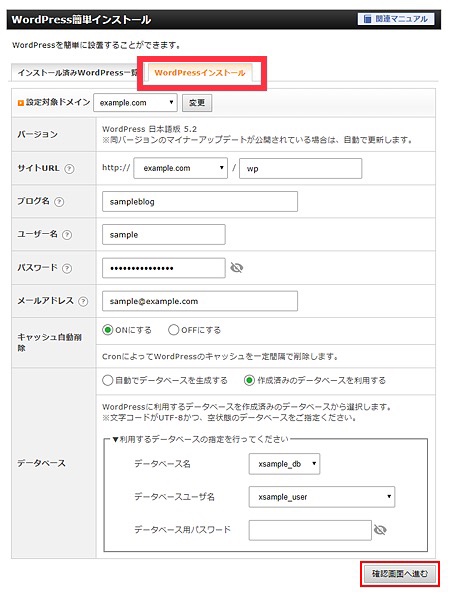
Did you see a page with input fields like the one in the image?
Here, you can proceed with the input according to the following flow!
input contents
Site URL:Leave blank
Blog Name:Give your blog, which will be your home, a name! (You can change it later!)
User Name:Username to use when logging in (remember to write it down!)
Password:Password to use when logging in (note here too!)
Email address:Your regular email address
Automatic cache deletion:Select "Turn ON
Database:Select "Generate database automatically
Once you have finished entering the information,Proceed to Confirmation."Click on the "+" button.
If there are no errors in the content, please leave it as it is.Install."To.
After installation is complete URL of the management screen ・Login information (user name/password)will be issued. This admin URL will be opened every time you write a blog,Be sure to bookmark the link! Login information (username/password)"Also make a note to not forget the
Invalid URL. It may be waiting for the program settings to be reflected. Please wait a moment and try accessing again. Please wait a moment and try accessing again. (1) Leave time (2) Delete the browser cache Try this one!
I'll log in to WordPress right away!
Good night!
Step (3) is now complete!
Before Step 4,Let's quickly log in to the installed WordPress!
Log in is bookmarked earlier."admin screen URL"This will be done from
User ID. ... "Password."
Enter each of the information you have just set up and written down.
This way,Control Panel."indicates certainty, emphasis, etc.Dashboard."The page is called
Basically, from here, we will work on blogging, changing and adding design and functionality.
To check your blog, go to the top left, above the "Dashboard".House Marks."The first floor of the building is located on the left side of the building.
Did you see a screen with this display?
This will be your blog.
With nothing,What?" he said! You're going to build all those pretty sites we see all the time from here?"
You may be concerned,Please rest assured!
Even the most famous bloggers today started here.
And how to create a beautiful website that suits your taste,No special skills are required.
We told you at the beginning,Type of blog = themeAnyone can create a stylish website by using the
Themes will be discussed in the next section!
Step 4 of how to set up a blog|Complete the initial WordPress settings.
STEP
Sign up for a server
STEP
Obtain a domain name
STEP
Install WordPress
STEP
Initial setup of WordPress
Everything does not have to be done now!
We are very close to finishing all the work!
Let's just complete the initial setup so that you can blog smoothly from now on and have no regrets later on!
Specifically, there will be a total of seven settings. *It's totally OK if you don't know what the words mean!
Design theme settings
Setting up permalinks
SSL Settings
SSL redirect settings
Plug-in Settings
Google Analytics Settings
Setting up Google Search Console
*Settings 5~7 can be done later, no problem at all, so we are almost to completion!
1. Design theme settings
As I mentioned earlier, I'm one of them and most of the active bloggers.Design Themes."We utilize something called
Even for someone like me who didn't understand words like HTML and CSS at all,You can easily change the colors and layout to create your own unique blog.
There is no way to avoid using this.
There are both paid and free design themes.
If I'm going to do this, I want to keep the blog going!" I want to be able to make some money with my blog."
If you think this way,You should definitely purchase paid.
Actually I was, when I started blogging.Let's just do it with as little money as possible."So, naturally, we started using free themes.
Results,I have not been blogging at all.
At the time, I was dissatisfied because the appearance of my blog was different from those of other active bloggers, so I taught myself CSS and HTML, and went through a trial-and-error process of doing things this way and that.
Of course, it didn't work out,There is a problem with the screen not displaying and it is just too much work.
I did learn a little bit more about how it works, but no matter how far I went, it was still far from my ideal,As a result, I've moved away from blogging.I know, right?
And why I started blogging again and continue to do so,Completely thanks to the purchase of a paid theme.It is.
with this as an opportunityI can now focus on blogging.
What I would like to share with those who are just starting out in the blogging world is this,It would be too much of a waste to quit blogging for some strange reason like I did!That is to say.
By the way, there are a number of themes themselves,There are not many themes to choose from if you are just starting a blog, so you can choose from the following.
No Regrets! Recommended blog themes that you won't miss
SWELLIf you want a simple yet sophisticated blog, don't hesitate to use this one!
This is my current favorite blog theme. Simple and cool..! I know quite a few bloggers who feel that this theme is the best for them. I spent several years getting to SWELL and it was hard to fix,We recommend that you make it SWELL at the beginning from the bottom of your heart. Even if you have no programming knowledge,You can achieve the blog you envisioned with SWELL alone.
It has strong SEO and is chosen by bloggers who publish useful information on finance, side hustles, etc., rather than fashion/lifestyle blogs. It is also highly customizable, but a bit of a hurdle for beginners.
As for how to choose, color schemes, etc., can all be changed later, so you can look at the atmosphere and see what you like.I kind of like these sites!"It is OK if the theme is
Personally, if you want to communicate about your personal surroundings and hobbies, don't hesitate.SWELLOne choice!
Although the price is high, we can assure you that no better theme currently exists.
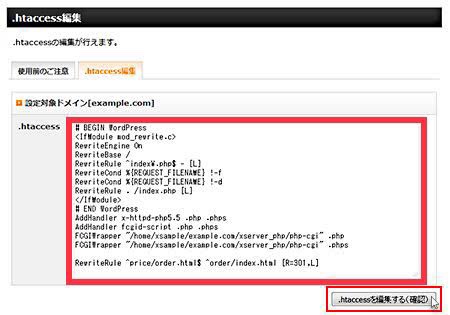
Home Page"column (of a newspaper)Edit .htaccess"Click on the "+" button.
Image orange,Edit .htaccess"If you select the tab forLetters that don't quite make senseThe "A" and "B" are all lined up in a row.
*Image is for sample purposes only,String descriptions will vary.
We're going to do a little additional work on the string now, but before we do thatAlways copy the original string and save it somewhereLet's do it! This is to recover in case of incorrect operation.
When you have completed your note, write the following text in theAddendum at the topPlease do so.
I recommend the page called "The following page is very informative!
This work can be done later! This alone will take a lot of time, so do it slowly at a later date!
6. setting up Google Analytics
Google Analytics is an access analysis tool for understanding detailed numbers such as how many times a blog post has been viewed (i.e., the number of PVs) and how long people have been looking at it.
However, this one does not have to be immediate!
Specific steps for implementing analytics will be coming soon.This sitefor reference!
7. setting up Google Search Console
Google Search Console is an essential tool for getting Google to recognize articles you have written and to check their search rankings.
After completing the analytics described earlier, we will proceed with the settings here.
For registration and setup, please contactThis siteFrom!
It's totally OK to write a couple of blogs and then just move forward with analytics and consoles.It is!